Article
Soda Can Part 1 - References and High Poly - Props for Beginners.
In this blog-launching article, Javier Benitez will explain how to model a soda can. A prop simple enough so that he can focus on what's important, the techniques used in games today.
- Author
- Javier Benitez
- Difficulty
- Beginner

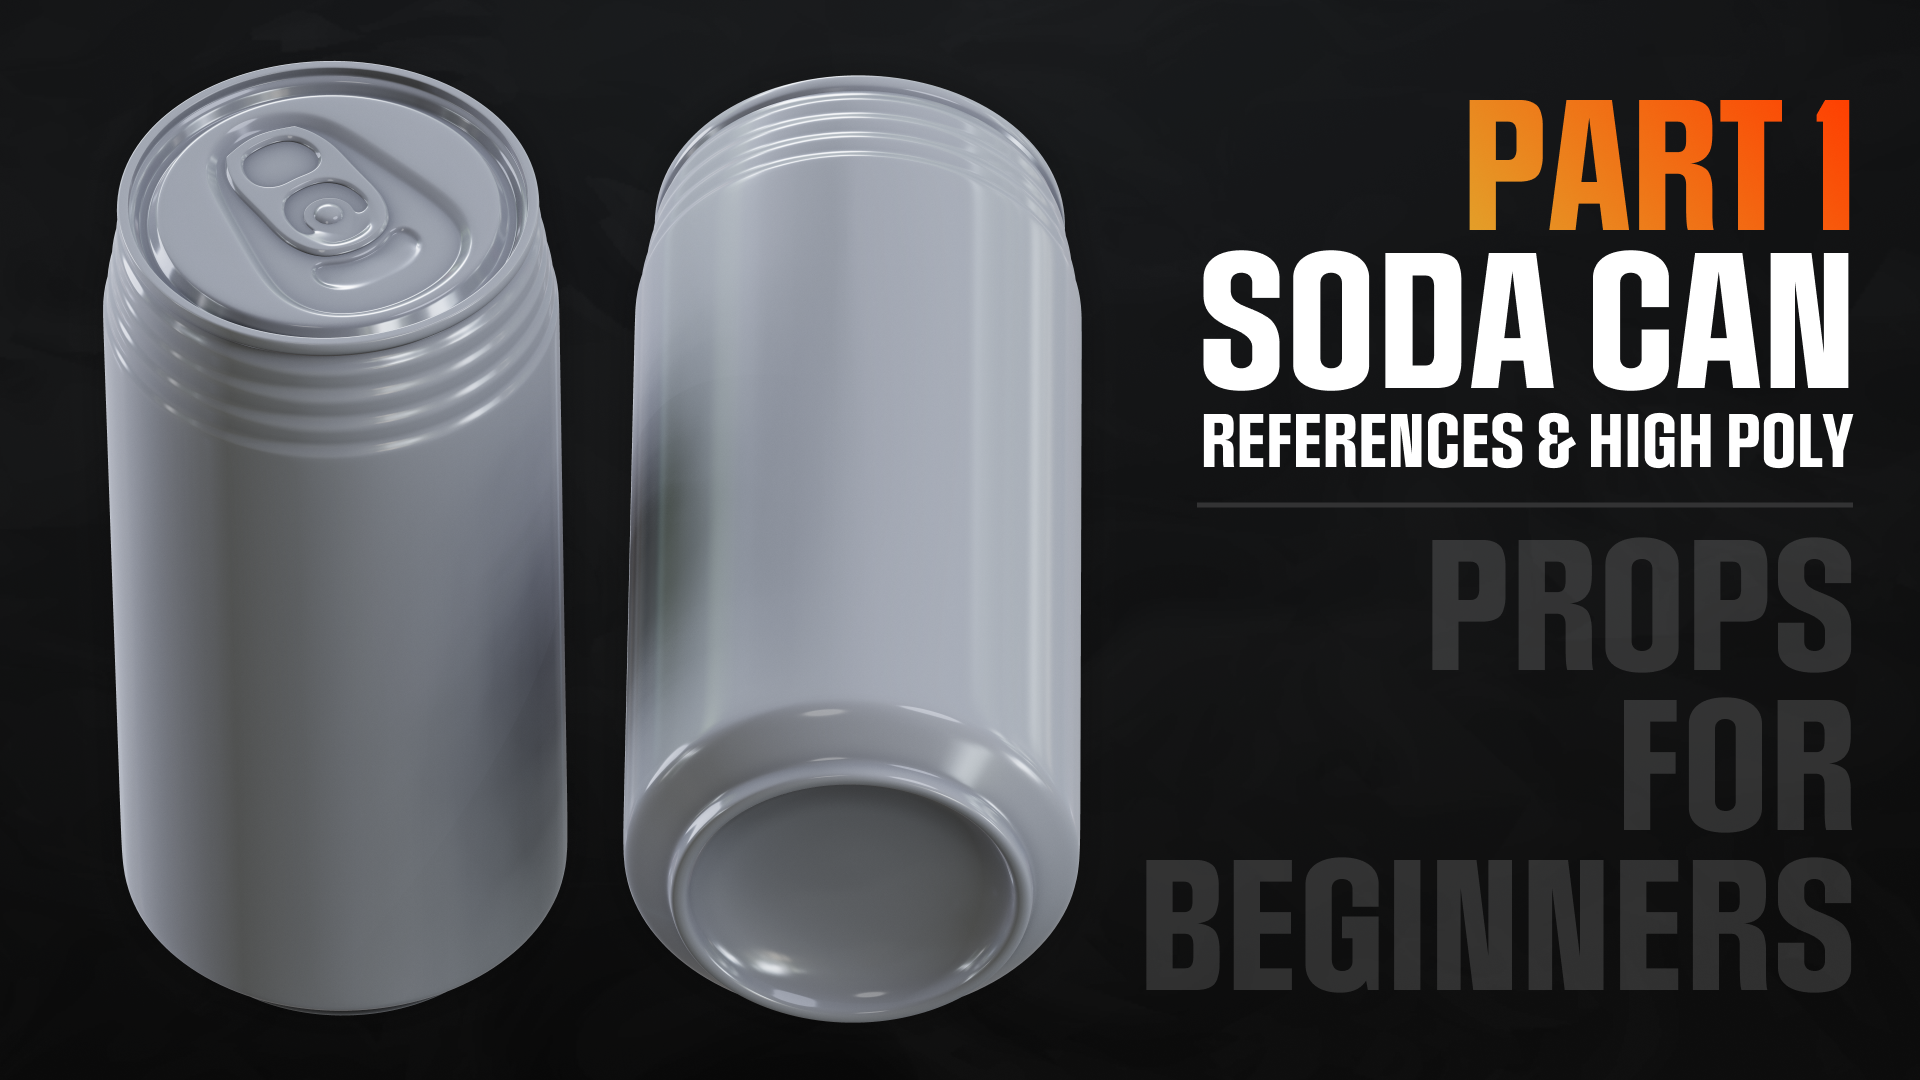
Hi! And welcome to our blog. With the purpose of helping our newer artists get the knowledge they need to succeed in games, we are putting together these series of articles called "Props for Beginners". For this first part, "References and High Poly", I will explain how to model a soda can from scratch.
For the process of modelling, I’ll be using 3Ds Max. If you are more comfortable with using other pieces of software, feel free to do so, but keep in mind some actions might be named or performed differently in your package.
The necessary knowledge to be able to follow this article includes a basic understanding of 3D art lingo and modelling. If any part is unclear to you, ask us on Discord!
Step 1 - Reference Gathering.
Reference gathering can be by far one of the most important steps once you understand the basics of 3D modelling. Software matters for this, since it can really make the process of reference gathering much simpler. During this article I’ll be using PureRef.
PureRef allows a simple drag-and-drop process directly from your web browser, making the process extremely fast. But what should you drag into PureRef? What is good reference?
This depends on the model you will be making. It can be as simple as having images with a few different angles for modelling, and a few shots of aged or worn + newer-looking examples of your prop for texturing reference (which by no means have to match your model, just the materials and general shapes).
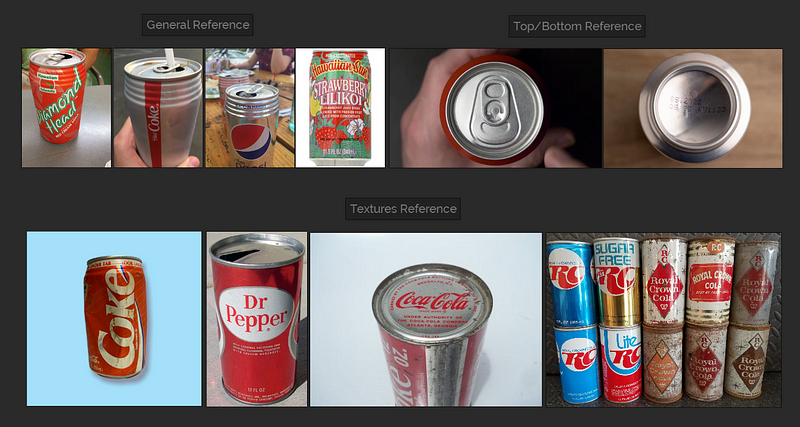
My references board for this project.
As you can see, nothing hard to replicate. The ref board for this asset contains:
- One flat shot used for modelling reference.
- A few reference images of my asset from different perspectives.
- Two extra shots for the top and bottom of my can.
- Some examples of a worn version of my asset, materials only, shapes are indifferent as long as they are close enough.
For more complex assets, you can really turn a PureRef board into a library of images containing the aforementioned references for each piece of the object you are modelling, from screws and cables to bigger parts like the main body of your object.
Step 2 - Model Blockout.
For some models, we can work on a “blockout” or “greybox” (two names defining the same concept) first. These objects should represent the dimensions of our prop without detailing it too much, like a sketch.
This model can be used, for example, by environment artists to quickly start constructing their scenes while prop artists polish the models to a final stage on the side. They can also be used to test their physics, or any gameplay behaviours they can be related to, or simply by artists to define proportions in multi-piece objects.
To make this blockout, I added my straightest reference on a plane, created a cylinder and did some minor adjustments to fit the shapes. For this object something as simple as this is more than enough:
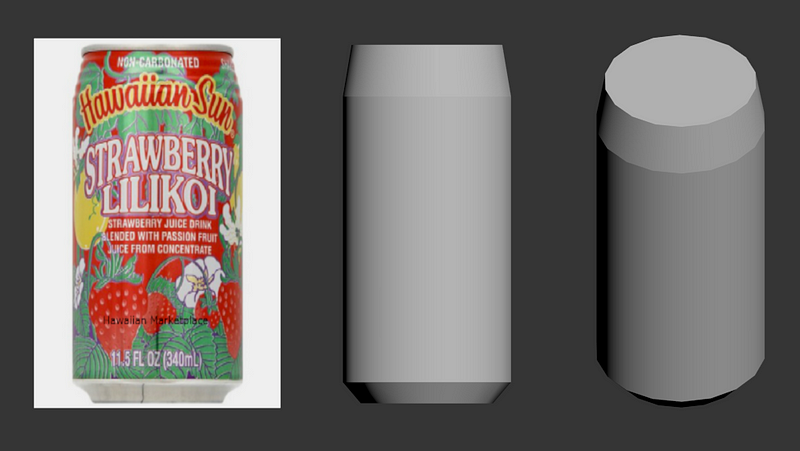
The can's blockout.
Keep in mind the plane is 2D and the can is 3D. If shot from the front, both objects share the same dimensions.
To ensure a 3D model is good, always keep in mind the real world dimensions of the object. In this case, I had a reference that was shot straight without almost any perspective, and a measurement for the diameter of the top. With both pieces of information, I could get this simple model.
We also don’t have to worry about any visible faceting for now. I used an 18-sided cylinder for this to keep it optimal as good practice.
Since we are basically modelling a funny-shaped cylinder here, and we don’t have anyone we have to deliver this to for tests, we could have just jumped into the action of modelling a high poly straight away.
Step 3 - Creating a High Poly.
Scene Organisation.
In order to define all shapes of our model and achieve the best looking results in our art, we are stepping into a process that should be done with extra care. But first, let’s learn how to work in a non-destructive manner.
Using layers, we can organise our assets. I’ll create a layer for the reference plane called “_ref”, another one for our blockout, named “Blockout” and a third one for now, “High”. In 3Ds Max, “0 (default)” is a non modifiable layer that I’ll use as my working layer.
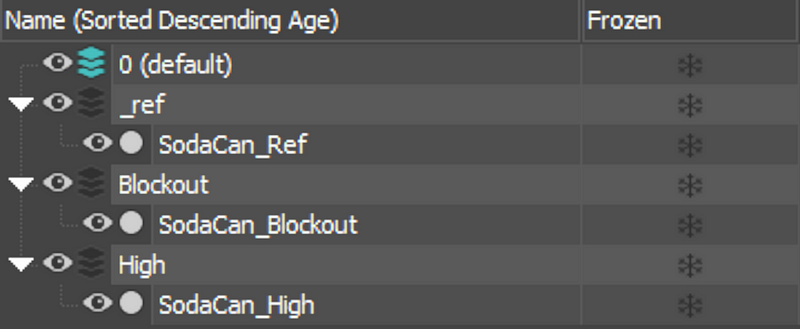
Our layer configuration
All is now tidy and good to go.
The Basics of Shaping.
We are now ready to start working on our high poly. First, let’s start adding all the details present in our silhouette. To do this, introduce loops and modify their scale and position to achieve the best results, like this:
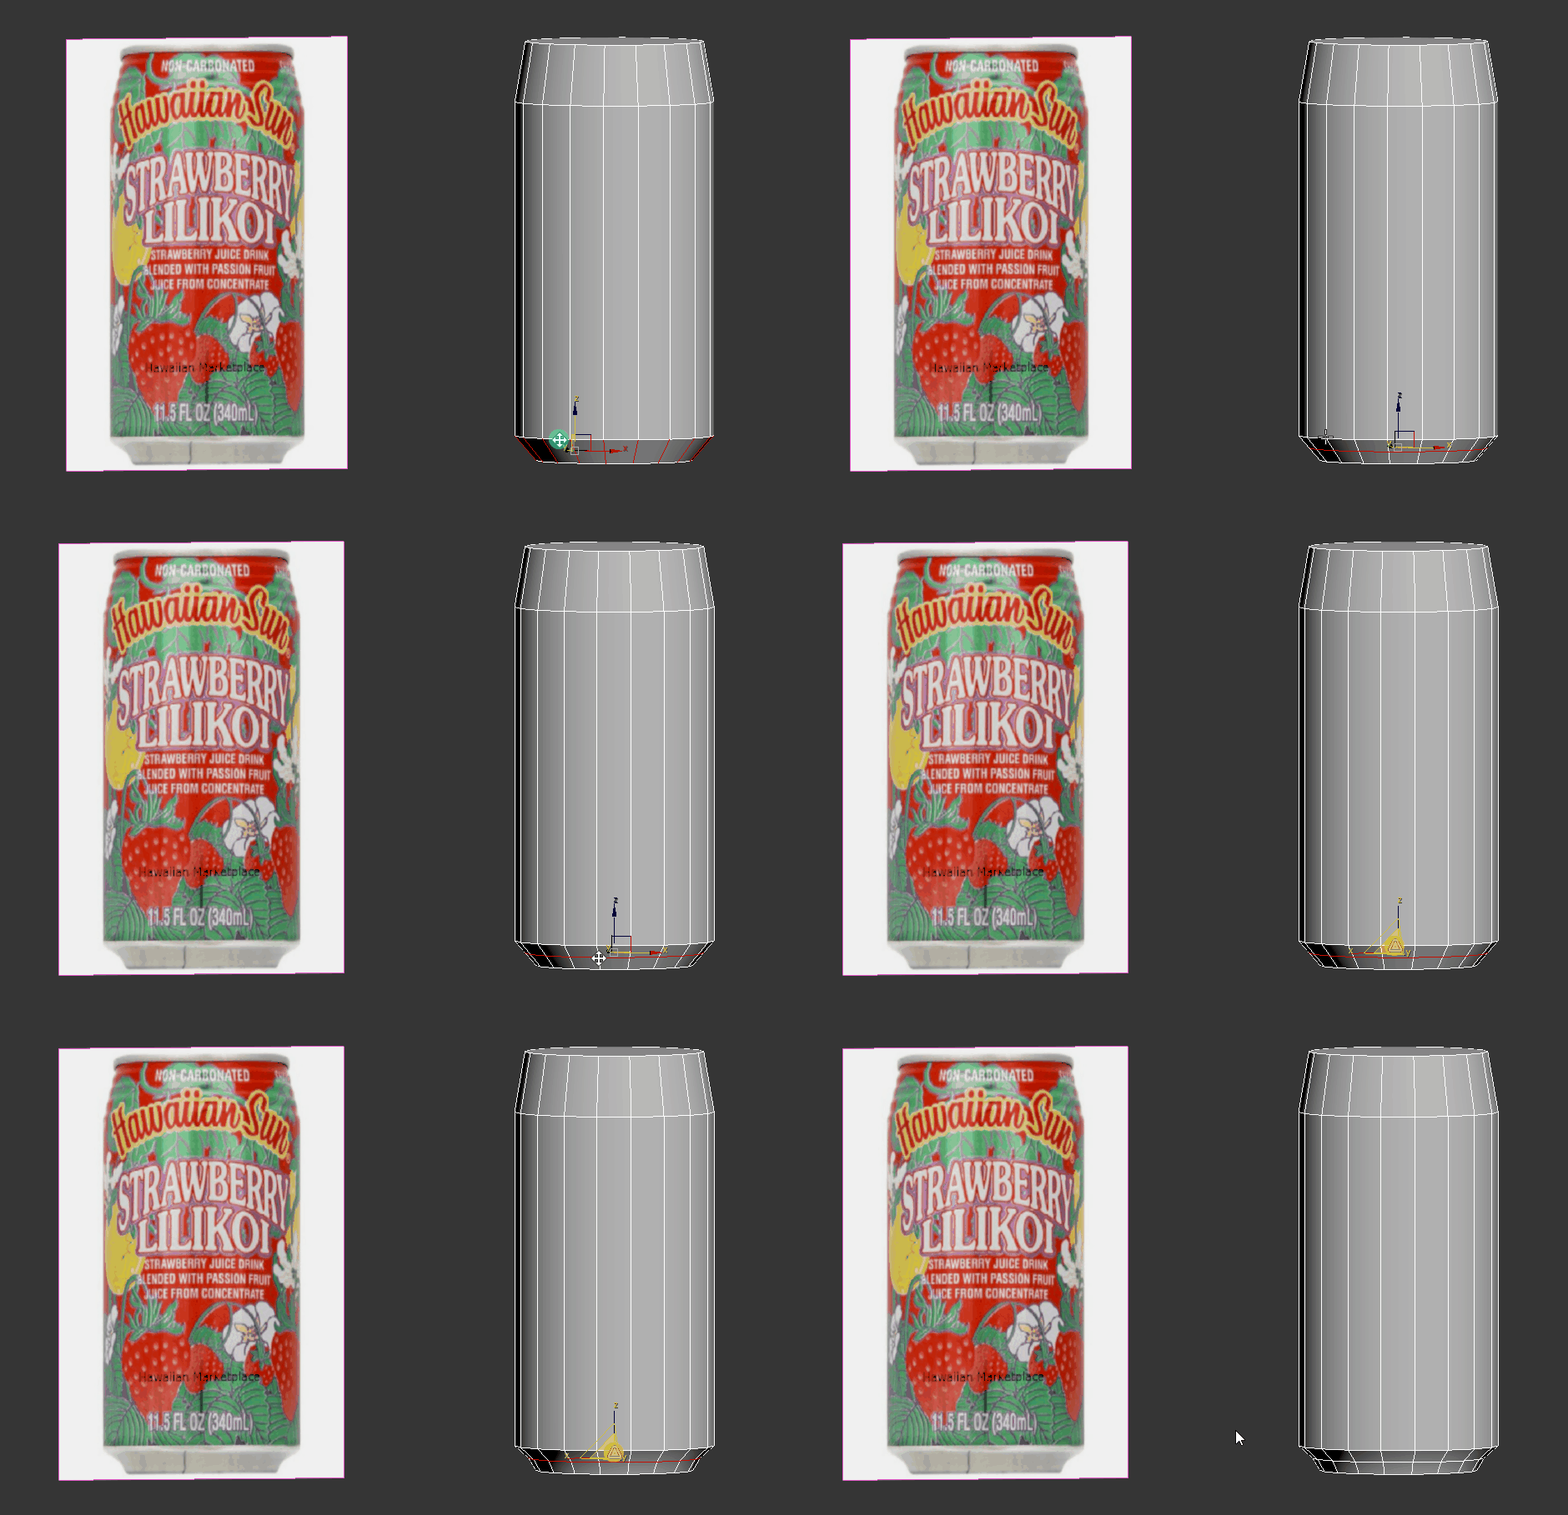
Inserting and shaping our loops.
To work more comfortably, feel free to align your model with the reference. This will also make you model more precisely.
We are now ready to start working on our high poly. First, let’s start adding all the details present in our silhouette. To do this, introduce loops and modify their scale and position to achieve the best results, like this:
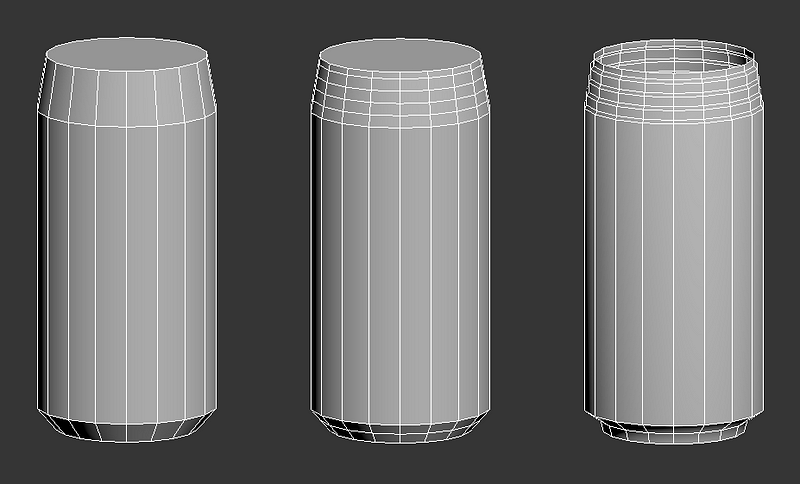
Iterations on the can's body.
Note that I removed the top faces in the last iteration. We will be modelling the can in the most realistic way possible, so that means modelling each part separately, like they would do in real life.
Let’s also not forget about the bottom part of the can, as the body is moulded in one piece. I’ll do a basic shape first, and then chamfer/fillet the edges to apply a rounder shape.
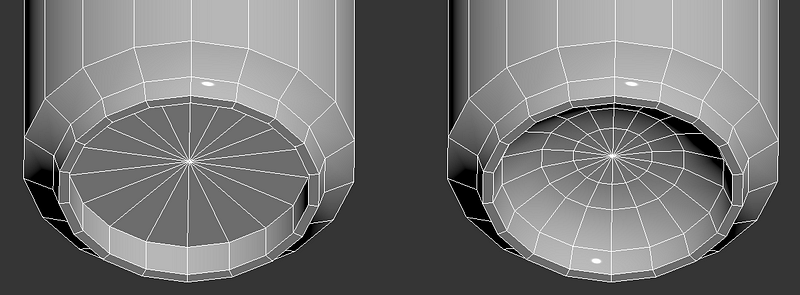
As a final advice for modelling in general, do not use too much geometry to achieve your basic shapes, as we will handle this using subdivision modifiers.
Note: Depending on the type of work you are doing, it may be worth to continue modelling your parts without jumping into Subdivision modifiers yet. This can help you visualise better many things like scale, amount of detail, and overall composition for your object before committing too much to a shape.
For me, I like to process my pieces one by one from start to polish, as I focus better on each shape and its reference, and avoid jumping around between shapes too much and lose my train of thought for a particular piece, which doesn´t really block me from doing any adjustments later on.
As you will see during the article, 3D art requires you to make choices, and there's no wrong way to do art if it works for your needs and your client's. Developing the capacity to think for yourself is the best tool you'll ever have, so take my notes and advices and adjust them to your liking if you need to.
Working with Subdivision Modifiers.
Our model now is one step closer to our reference, but there’s still a lot to do. We can continue by adding subdivision levels to our object, which will round our blocky shapes, giving it a much nicer look.
To start, I’m going to prep my model for subdivision. There’s many ways to do this, but the most straightforward will be to add supporting geometry for the edges I want to maintain hard, and add a TurboSmooth modifier.
To add the loops, you can use any loop inserting tool available in your software. I’ll use a mixture of “Connect” and “Swift Loop”, and do my best to maintain the distances consistent.
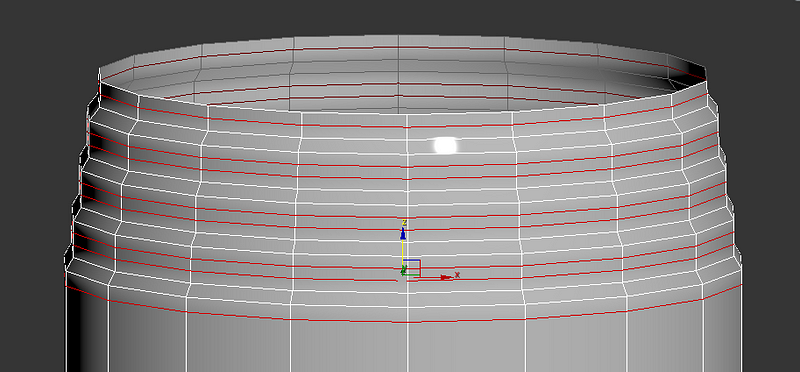
Example of support loops.
For more experienced users, try experimenting with chamfers and set the edge depth to 1 to achieve this faster. As you can see in the example below, it’s a much faster way to add support loops, since you get the distance for both edges perfectly equal.
Apply this concept but with a “Chamfer” modifier and you’ve got a non destructive way to add support loops super fast!
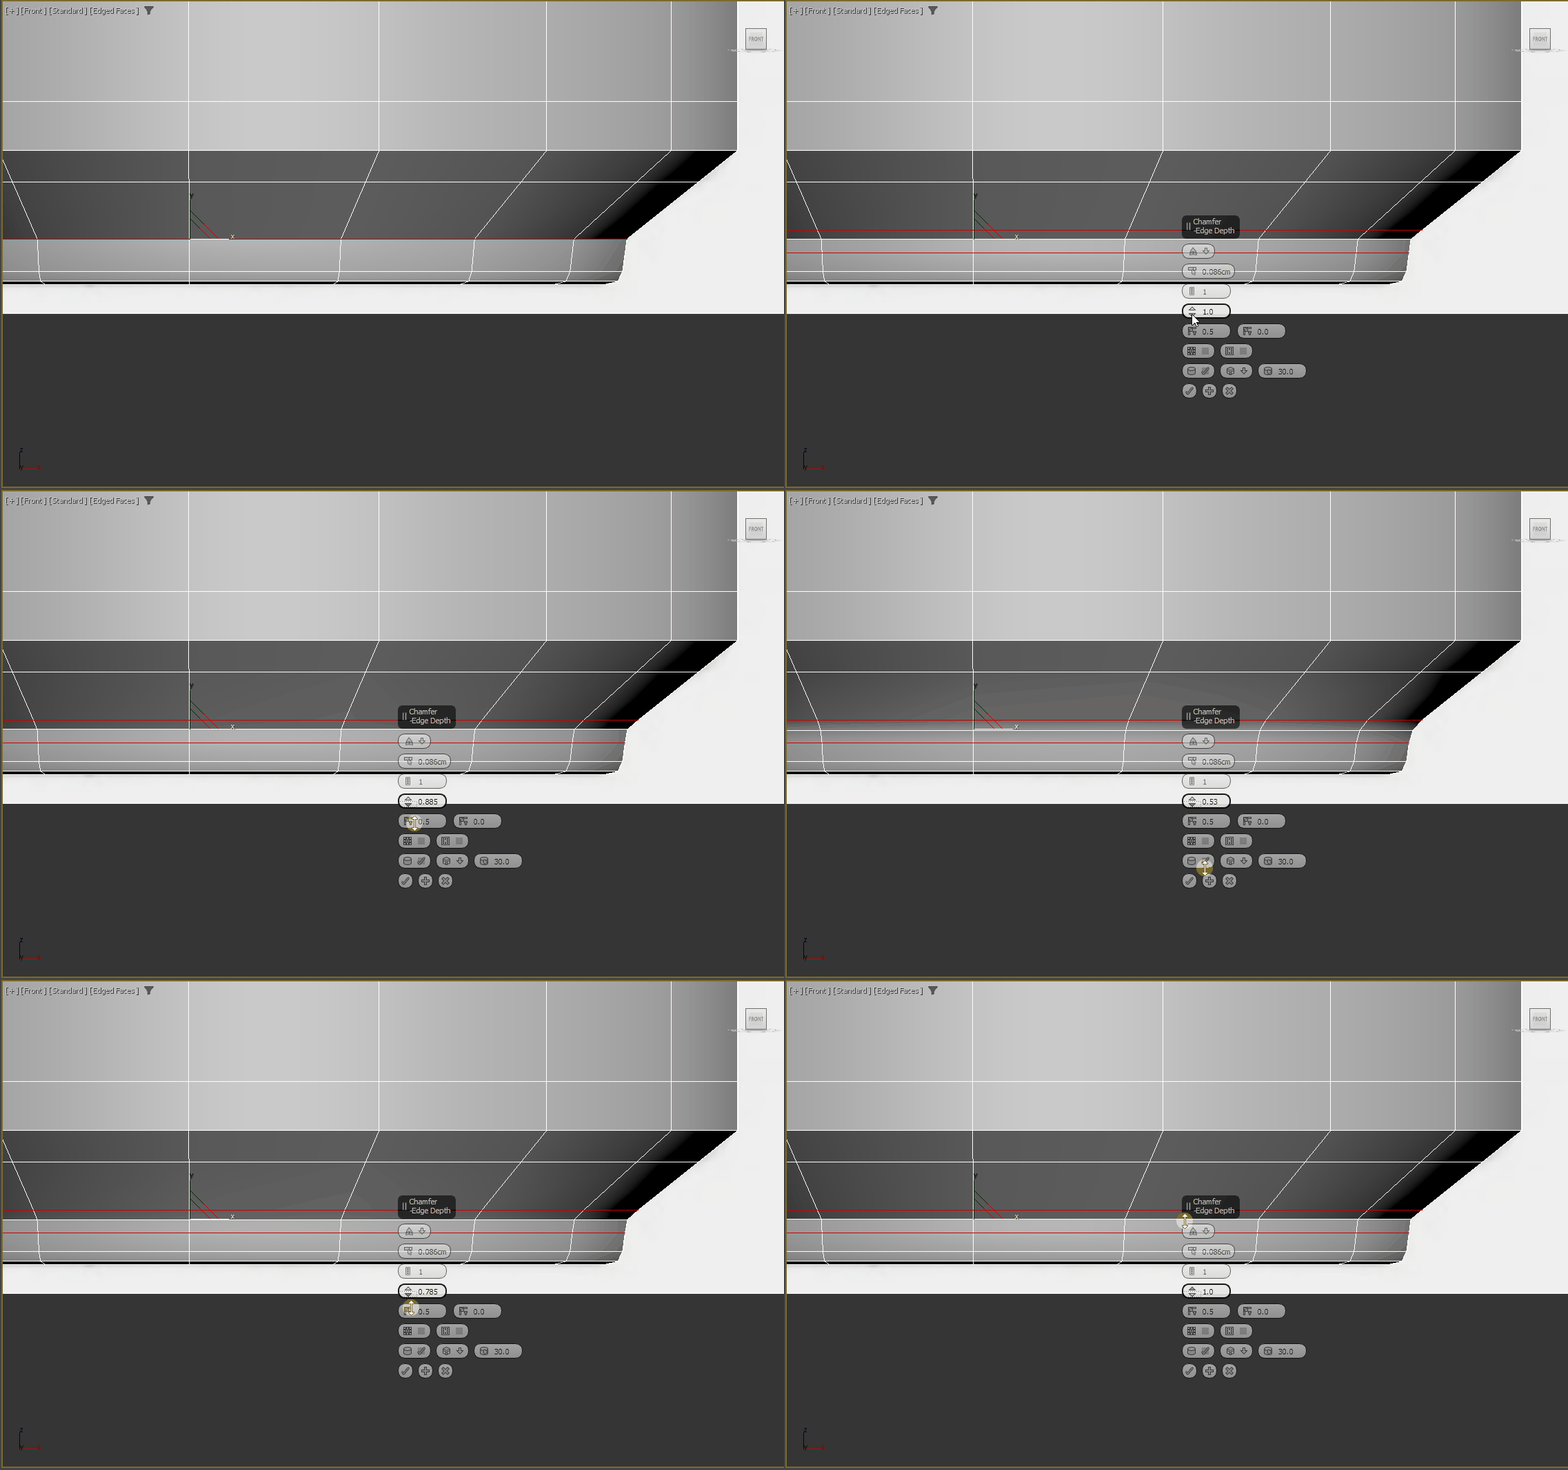
Back to the subdivision modifiers. How this works is a bit hard to explain and understand at first. The TurboSmooth modifier will multiply your geometry by 2 per iteration, place the new edges on the sides of the old ones, and relax the old edge so that it’s now creating a round shape.
The example below shows how the support loops are still present in the model, and how they are helping to contain the roundness of the older edges.
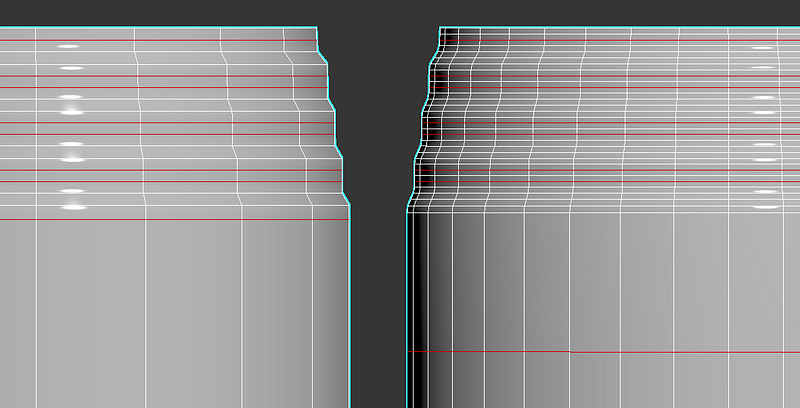
Support loops vs Subdivided mesh.
If this is somehow unclear, try applying a TurboSmooth modifier and adding loops close to the edges that you want to maintain hard, one by one. It will help you visualise the changes you are applying to the model.
If you want to have a tidier version of a smoothed mesh, you can turn on “Isoline Display” on your TurboSmooth settings.
Always remember to adjust your support loop distance to ensure the correct amount of edge smoothing too. It’s very important to note that we aim for a smoother object than we see in the reference even if your objects may appear softer than they are in real life. This will ensure the roundness is maintained when looking at the object from further away, as well as provide enough pixels for a lower resolution bake to properly display your smoothness.
As we will be discussing often, this also a factor that depends on your minimum viewing distance. An object that is always rendered from far away will need a softer edge, and a more hero type asset that is rendered from up close will need tighter edges to avoid a "plasteline" look.
As a note, on a production environment you'd need to keep in mind what the roundness looks like across the whole project per material and object type, see what your bake looks like at in-game resolution and adjust the object´s roundness according to it to ensure visual consistency for the whole project.
You can see there's really no straightforward answer, experience, care, adapting to a project's needs and developing a good eye for detail is what will end up dictating how soft or sharp your object should look. This is why we should work non-destructively, so I advise creating your support loops with a Chamfer modifier, which will help to make quick adjustments to your edges smoothness.
After following these rules your result should look something like this:
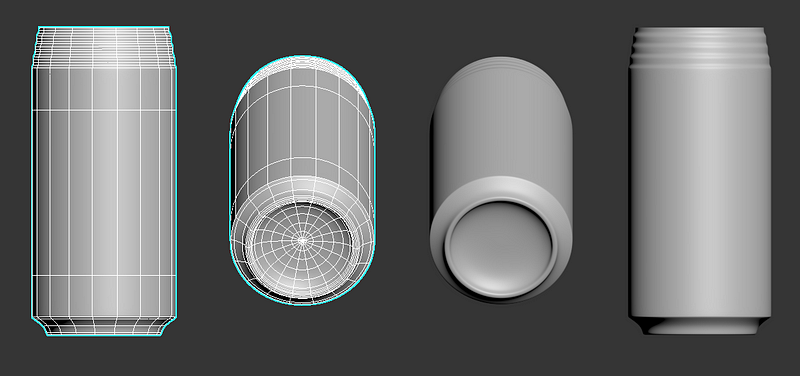
Our final can body.
If you reached this part, congratulations! You are ready to finalise the high poly for this prop.
Finalising the Pieces.
It’s time to delve into modelling the top. I’ll use my main reference for this. As before, I’ll add it to a plane and start modelling these shapes.
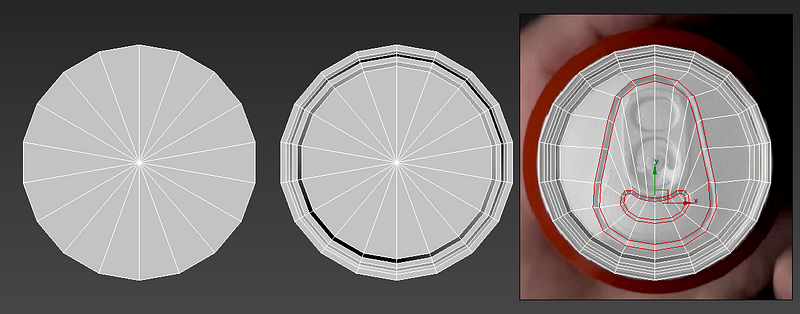
Three steps to complete the top of this can.
First, we started with the top of a cylinder. On the next iteration, we add the depth and shapes using extrudes. On the final version, we extrude to the inside once more and use the resulting vertices to define the outter rim of the detail. A few more extrudes and vertex placement later, we have the top of our can.
To ease up the process, note you can delete half of the object, do your magic and then re-apply the symmetry to get an even shape. Like before, it’s time to add our support loops and subdivide the resulting object.
I used a Chamfer modifier set to filter by unsmoothed edges. This way I can control where I´ll have a chamfer with my smoothing groups, telling my chamfer to work when an edge renders hard and to ignore when edges are smoothed. With this method, I can quickly change an object's smoothing if a project requires it, or if I simply got my edges roundness wrong.
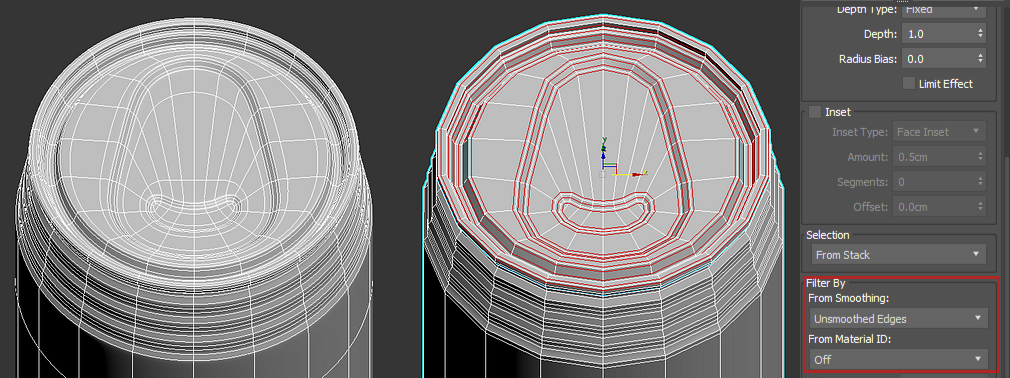
Our base can top.
We are missing a few minor details, like the cuts that allow a can to open. Those will be added later in the process, once we detail our Normal Map.
For the tab, we will follow the same methods, but with much, much more patience, starting with a plane to model it, and extruding its sides to then position the vertices.
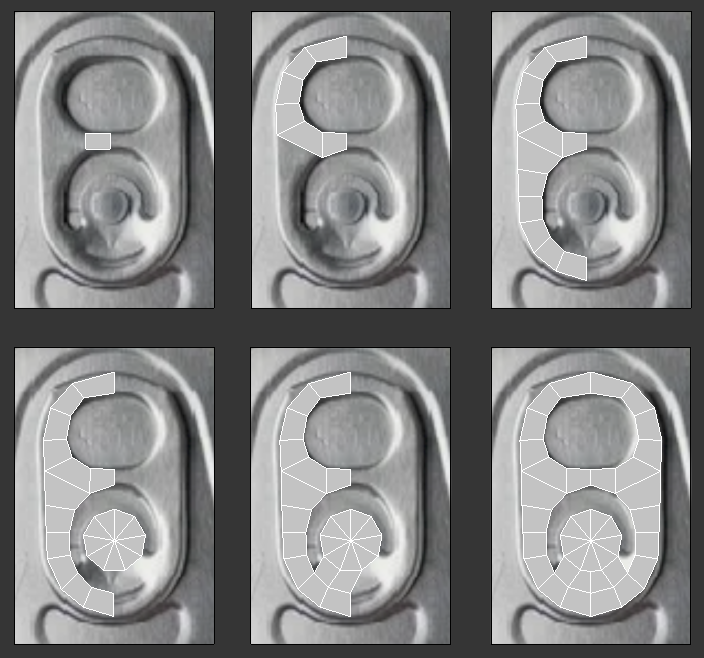
Notice how I added a cylinder to later merge it with the main object on step 4. I chose the exact number of subdivisions that would match what I had modelled already.
After the base is done, we can start adding the tridimensionality by extruding the borders down, and to add the sensation of it being a thin, folded piece of metal, we can add details like splitting vertices and separating them. These will become very apparent once we subdivide the object.
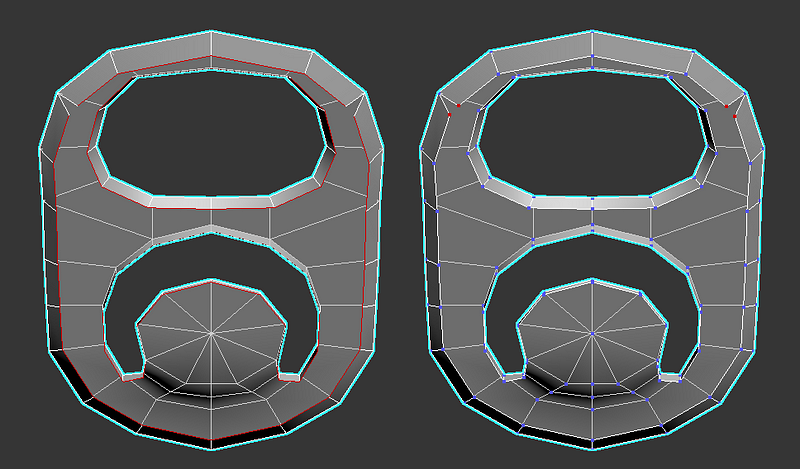
And speaking of subdivision, support loops will be a bit more special in this case. I want the TurboSmooth to some work for me, and that’s giving it the organic look it has.
I will start with a TurboSmooth with no support loops. After seeing the shape is way too round, I added a bevel. I’m not worrying too much about the disorder on the mesh as it will add to the organic feel of the object. I also moved some of the bevel up to achieve more roundness in some areas.
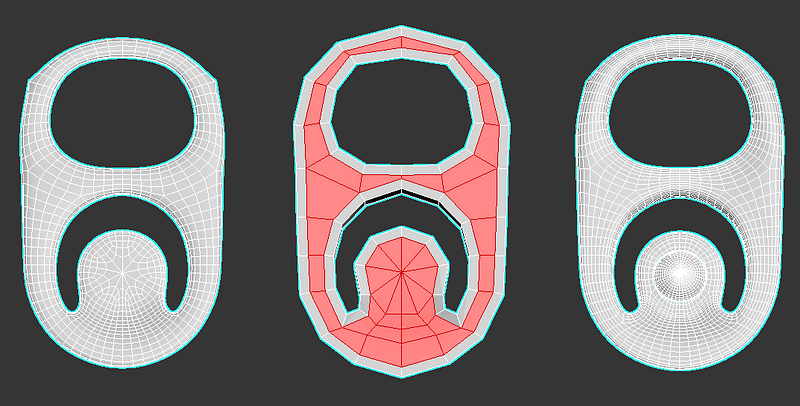
The tab's shaping is left mainly to the TurboSmooth, with minor adjustments.
After adding the rivet that holds this to the top, we’ve almost got a finalised high poly model for our prop.
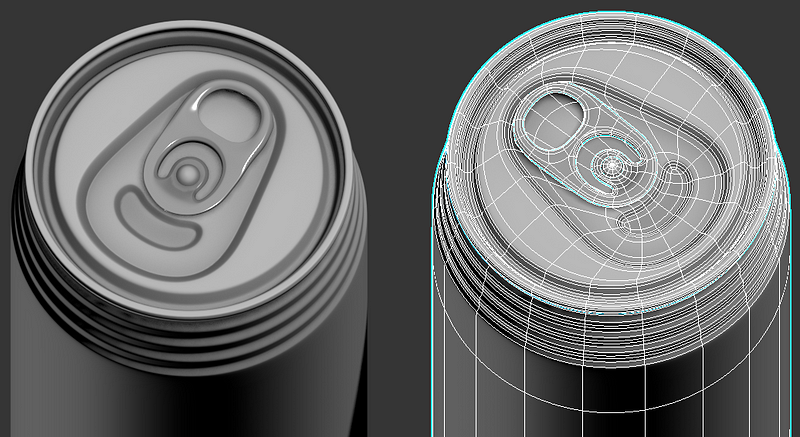
This is starting to look like a can!
Adjusting our base to match our references.
If we look closely at a few details, we are moving away slightly from their original shape we can see on the refs. For example, the small intrusion on below the tab has a slightly different shape than the one I modelled:

We can see the bean shape is roughly similar, but the outline of it has different widths and is almost completely gone on the bottom. Let’s fix this by first adjusting the edges that form the outline, and then playing with the separation of the support loops.
As you can see on the happy looking avocados below, the process to match a shape better is pretty simple. Keep in mind looking at it from the top completely shades some areas making them look much darker and sharper than they are.
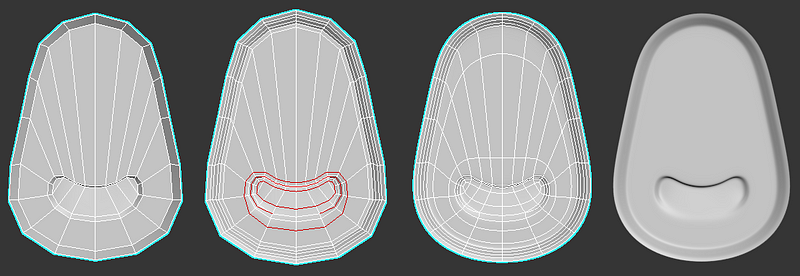
Steps to better match a shape.
Our reference also has some minor details on the tab. What seems to be a “V” below the rivet and some different curve on the bottom. The hardness on the edges seems quite different as well, so let’s work on all of this bit by bit.
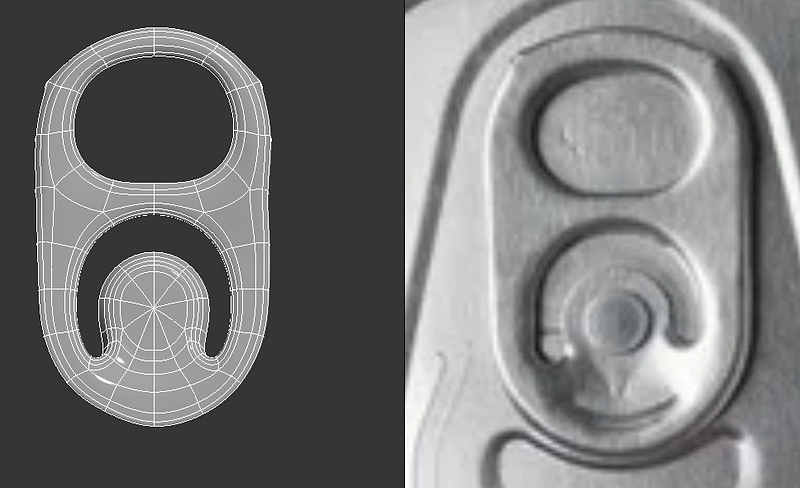
The technique here is slightly more advanced, so I’ll do my best to break it down. Since I realised about this quite late, I think I’m going to approach this as a remodel rather than a fix. I’ll start from step 4 of the tab modelling:
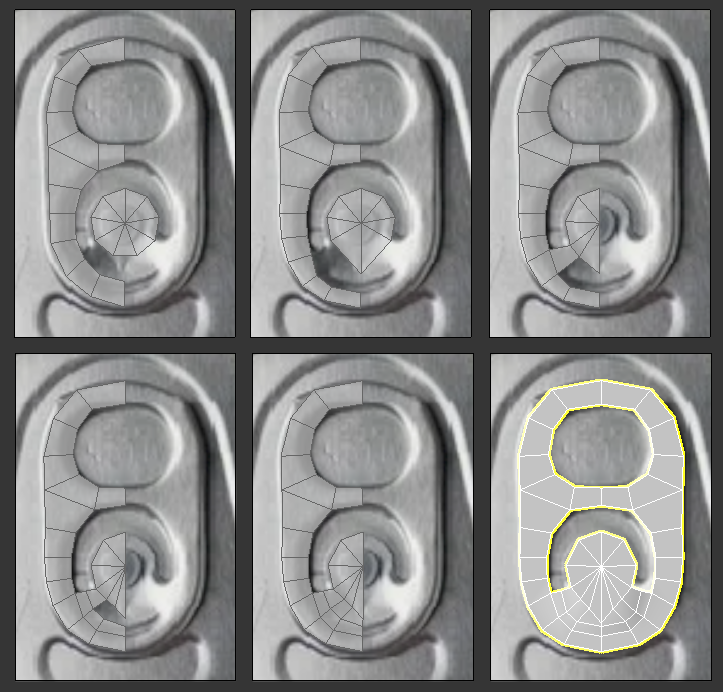
Steps to rework the tab.
In the steps above, you can see how I started from a base I had modelled previously, and started working on the adjustments one by one. Once they were ready to be merged, I did so and adjusted the small imperfections I found along the way.
Remember we will be using TurboSmooth to define some of these shapes. The hardest part will be to add support loops to this. Let’s give it a go after adding some depth using the “shell” modifier, or extruding the borders down.
To make the “V” shape more apparent, I’ll be using a bevel action, like this:
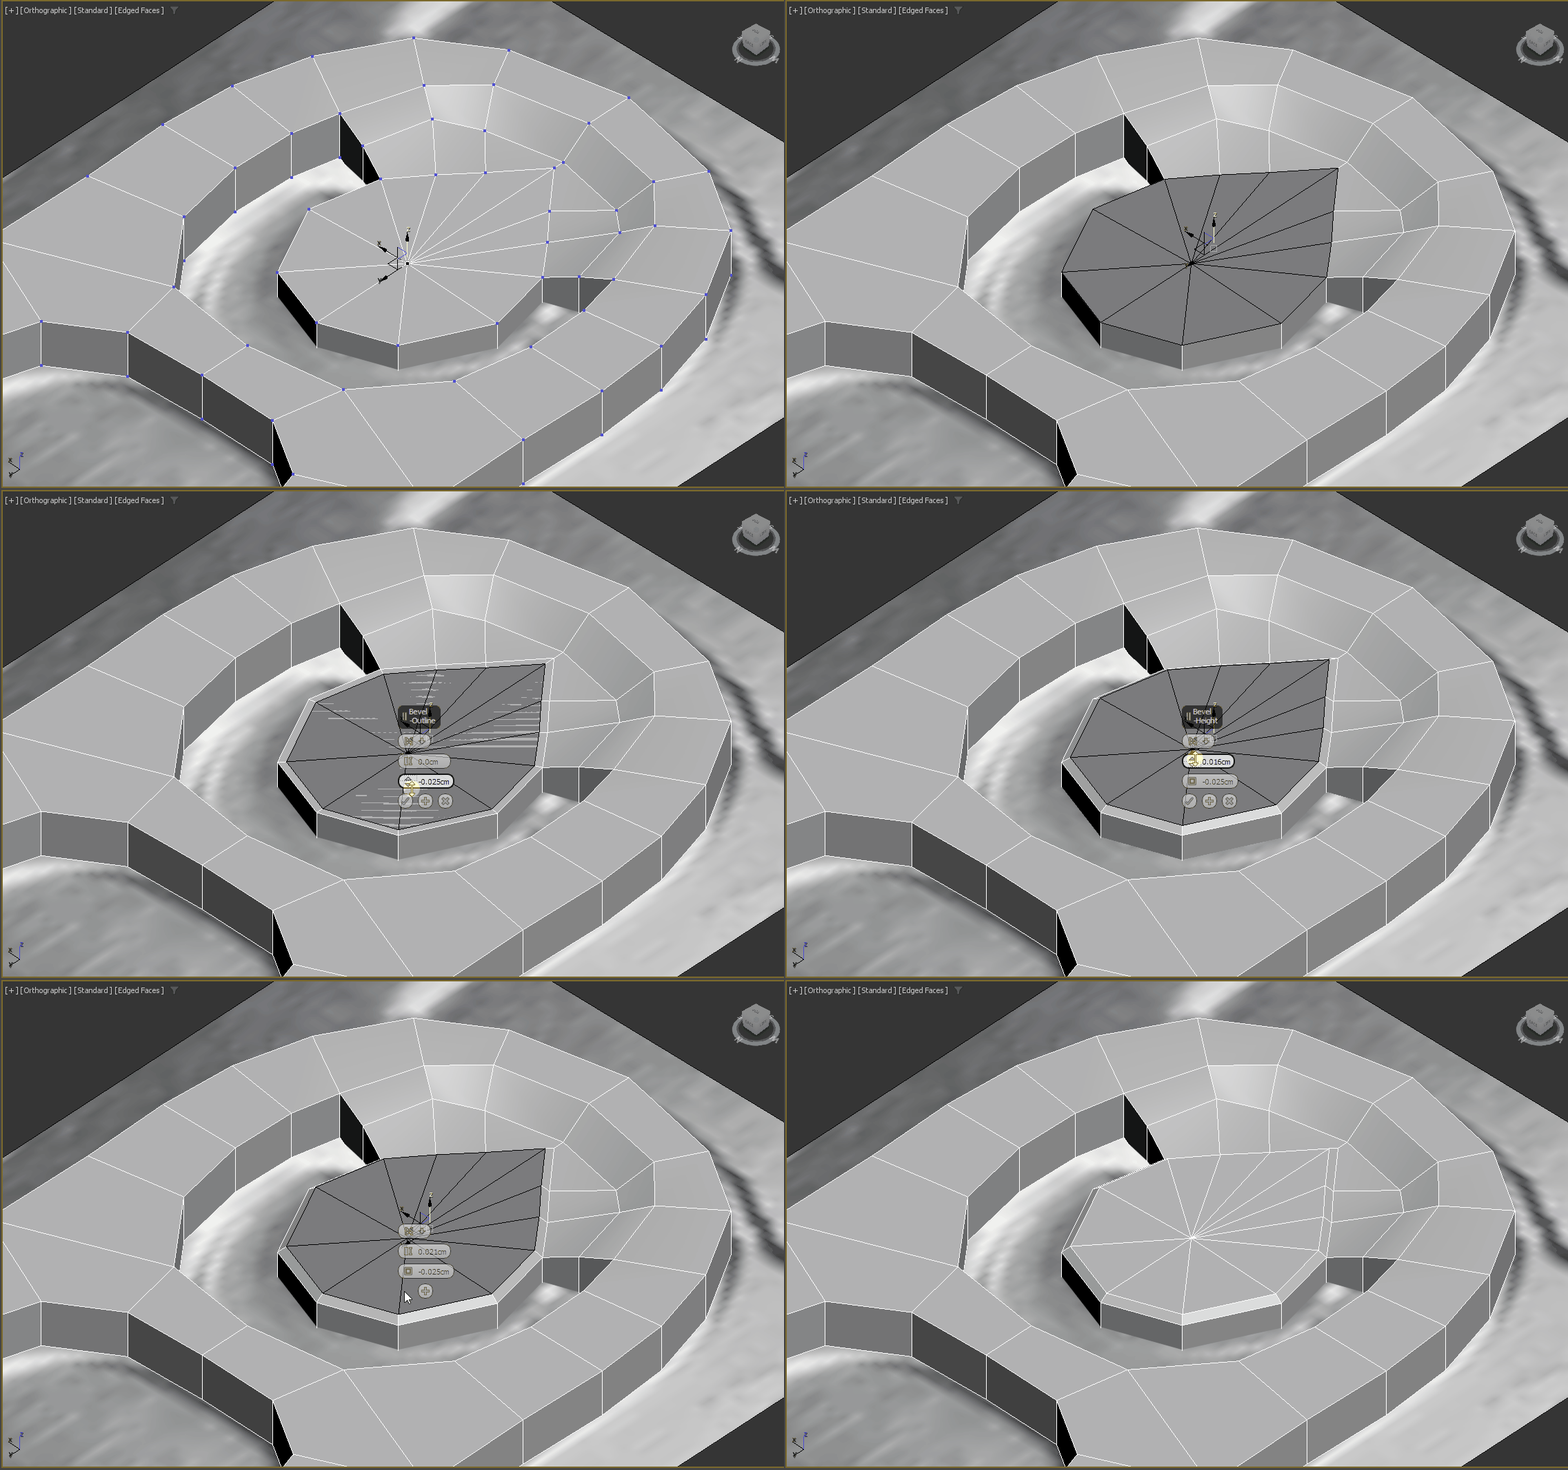
I wasn’t extremely happy with the shaping of the edges on this model, so I’ll take advantage of having had to repeat this part to make it all better. This starts with the roundness of the object, and how flat it felt before.
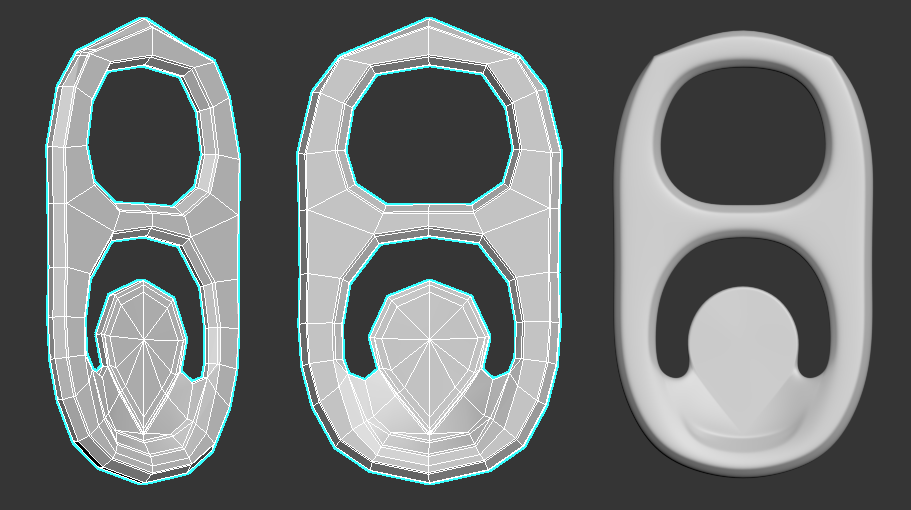
As you can see in the image above, I’m letting the TurboSmooth do all the work. There´s a few things happening here that I´d like to note.
My support loops are too close to the main edges. This creates some rather sharp transitions, but bare with me on this one, I know I´m breaking the rules but I'm doing so because I'm also creating some counter measures for this. Here´s how:
Notice how I created some bevels too, creating a 45º angle where before we would have a fully rounded edge. What this will do for such a small object, is keeping the roundness hard from a mid-distance view while also providing a chance for those edges to catch some light when looked at from far away. If I were to leave it fully smoothed, it wouldn´t look sharp and metallic from up close. This sacrifices the object's fidelity to the references from up close, but balances it to look good from any distance.
I’m happy with the result for a small detail like this. Spending too much time on polishing smaller stuff can be wasting your time, as “good enough” can be actually great when looking at it from the appropriate view distance, and in context:
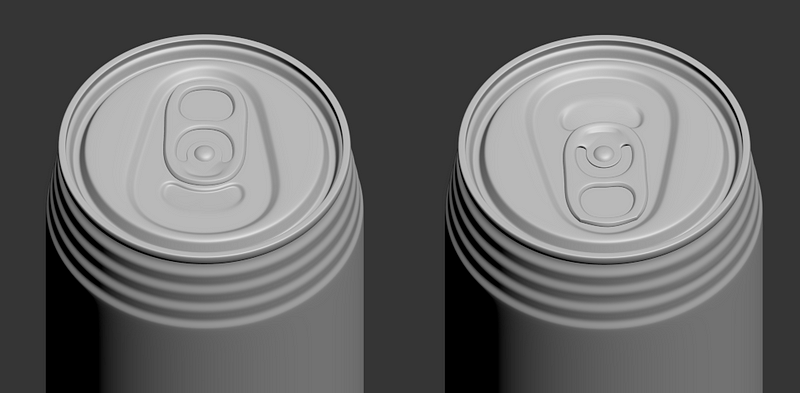
The final top part.
As I mentioned before, some shapes will be smoother than in reality, especially the smaller ones. This is tricky on thin sheet surfaces like a can, as we can easily loose the effect of it being metallic, thin, and cutting sharp, so always test your object from a few viewing distances. Mine works quite well as it has certain hardened bevels already, which act as secondary light catching edges once the very fine ones blur out.
If I´m unsure about a detail's roundness or sharpness, I would note which parts suffer from this, and check once baked and textured. We can always alter an object´s smoothness at a later stage, and re-bake. It´s easy to swap the normal maps in Substance too to accommodate for these changes, but I'm really getting ahead of myself here. We'll cover this on future chapters.
Also, for good practice, remember to take a few shots and send them to your friends for feedback. I've added an example for this a few paragraphs below.
Notes on Model Polishing.
There are a few things missing in our model. These don’t have to be done right now, and in fact I very much prefer to add them in later. As a rule of thumb, I try to avoid having details to change in the earlier phases of development. A high poly is the first phase, so if I had any feedback from a client on stuff that I can manage to add later, I’d have less steps to go back.
Let’s look at the end result and explain what I mean:
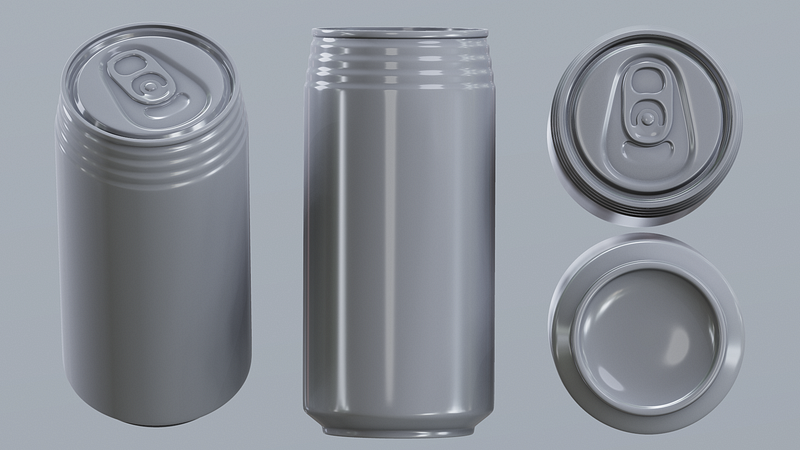
Some things that are planned to be made but not included for this purpose are:
- Silhouette deformation and damage: For realism, it’s important to avoid laser straight lines on delicate objects like this one. Further down the line I’ll add a few more loops to my low poly once baked to alter the silhouette.
- Small details like cuts, letters, and other imperfections: These can be easily added during the last step, texturing, which makes it very convenient if any changes are requested.
- Posing/Rotating objects for minor variations: Again, for realism. A screw is not perfectly aligned with another screw ever. Same with the tab on this can, for example. This can be done later during the final game model assembly.
- Some parts of the object may be slightly smaller or bigger on the references: If you realise about this later, like I did for the tab, it´s always fine to adjust your proportions a small amount, always making sure it doesn't become noticeable in your texel density, and as long as you are scaling whole objects, not faces.
Things like these will also make other steps of the process much more simple. For example, reducing the geometry on an angled object can result in the impossibility to move things up and down, since our pivots are not fully reliable on local space.
Another example, baking a silhouette imperfection will require an object to be unwrapped with no symmetries. Having a detail made too soon can condition the way we optimise an object negatively.
As a note to clarify on some minor imperfections I may have left along the way, here´s a small piece of advice. Always keep a notepad with you at all times while modelling. On mine, I keep writing down small issues I encounter during the process. For example, I´ll note to my future self - "Remember to bend the tab slightly once in final baked LP (Low Poly) stage." or "Fix the proportions between the tab and the details around it".
These can really take a lot of weight off of your shoulders and speed the process a lot, since you can keep moving forward with the confidence that these fixes will come later, and perfection can be achieved in the longer run rather than being limited per stage.
So overall, try to always look and think of ways to avoid having to add detail until the very last steps, unless it’s completely necessary or if it’ll significantly boost the quality of the object. It will help you work in a less destructive way.
Outro.
It's been long, and a lot has been said. There's a lot to learn for modelling, but the most important part is to build on a solid base. As a recap for this post, we’d like to provide a few points as a cheat sheet to refresh what we have been talking about here.
- The right software can make the reference gathering process simpler.
- Good reference boards should include images of your object from different angles for modelling and examples of similar assets in different stages of decay for texturing.
- For complex assets, use PureRef boards to create a library of images with references for each piece.
- Create a blockout first, which represents the dimensions of the prop without detailing it too much.
- Always keep in mind the real-world dimensions of the object to ensure a 3D model is good.
- Organize the assets in layers to work in an organised manner.
- Work on the object´s pieces in a realistic way. Each piece should be modelled separately.
- Work with subdivision modifiers to round the blocky shapes and give the model a nicer look.
- Try to break down a complex shape into simpler ones, and bridge the gaps between them to finalise them.
- Keep in mind your minimum view distance and don´t waste time on perfecting features that can be lost from a normal distance.
- Avoid adding details that can condition how you model a piece, or that can make you go back many steps if they need to be fixed.
On the next chapters of this series of articles, we will continue tackling this prop in the detailed format we achieved on this post.
Next up:
- Optimising for Games. (Coming Soon)
- Texturing. (Coming Soon)
- Lighting and Presentation. (Coming Soon)
We´ll be adding links to these parts and convert them to a series once we have them all ready for you. Thank you for reading!
